Story Mapping
Story mapping is a method to visualize user stories and gain insights into your customers needs.
In this article, we will show you what story mapping is, what the technique looks like and how you can benefit from it. Further, we will show you how you can create a user story map in a few simple steps so that you can implement this method into your company.
Table of contents
What is Story Mapping?
As the name indicates story mapping or user story mapping, is a product management technique that allows you to visually map out user stories. The method helps to arrange user stories to get a more integrative overview. Story mapping allows you to step into the shoes of your customers and therefore understand all the ways a customer might interact with your product from the first time they come into contact with your product to the fulfillment of your user’s objective. This helps you realize which features are necessary to provide them with a fully functioning and satisfying product.
Apart from its effectiveness, the technique is also widely used as it engages and involves people to physically build the product backlog on a wall or a desk rather than composing a long and tedious document. It encourages productive conversations and supports collaborative work.
What Does a Story Map Look Like?
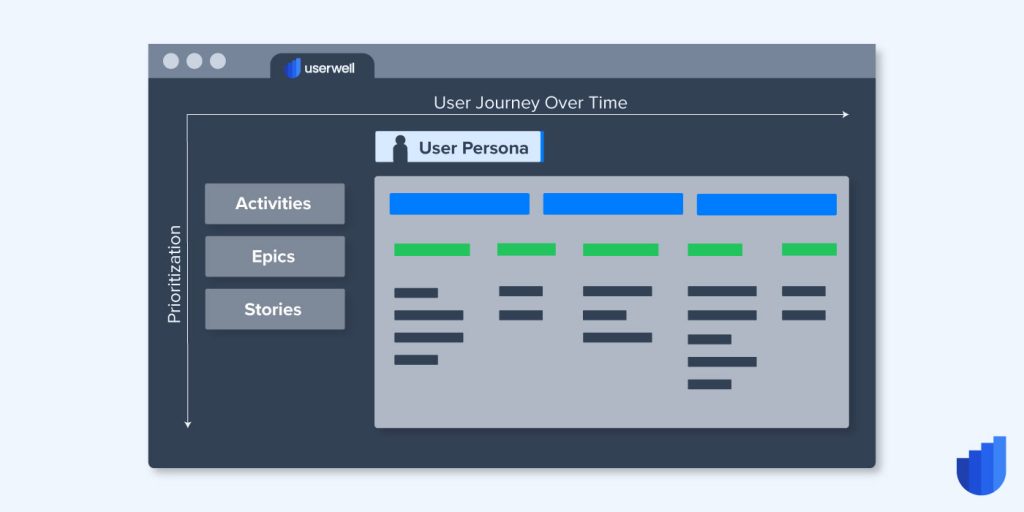
Visually the map consists of two different dimensions. Along the horizontal or X-axis are the user activities depicted. It hence represents the user journey over time, from the first interaction to the user’s completion of the objective in chronological order. The priority of the activities is represented along the Y or vertical axis. The higher up on the map the activity is, the higher the priority.
Jeff Patton developed the story mapping tool. He defines the following elements as necessary to create a story map:
1. Epics: An epic or a theme describe the overall user activities. They represent the individual steps of the user journey and are therefore ordered horizontally along the X-axis.
2. Backbone: Together the epics make the backbone, which is the basis of the story map.
3. Stories: Stories are positioned on both axes of the map. They are used to specify the epics but also can be prioritized vertically. Stories focus on the functionality behind the activity.
4. User personas: Personas are representations of your customers and users. They are created by collecting data through customer interviews, etc. On the story map, those are pinned to corresponding epics.
And this is what it looks like in practice:
Advantages of (User) Story Mapping
Story mapping is a very flexible model that offers many benefits. It allows you to form it in any way you want. Next to that, story mapping also offers the following benefits:
- Visualization of objectives: A clear benefit of this technique is the visual aspect. At one glance you can make out the goals of your product and always come back to it during the implementation progress.
- Focus on prioritization: With the two different dimensions, there is of course a strong focus on setting clear priorities which will help you especially in a long-running project not to lose focus.
- Engaged communication: Would you rather sit alone on your desk and write down what you think your customers want or would you prefer to have a productive conversation that engages your whole team and brings up something you alone might not have thought of? The beauty of Story mapping is cooperation.
- User journey map: Much like prioritization the user journey map is one benefit you get from creating a story map. The backbone with its epic is the basic version of a user journey. Of course, you cannot use it one-to-one for a different purpose, but it forms a basis for further projects that you can come back to.
How-to: Story Mapping Step-by-Step
Now that we know what story mapping is, what such a map looks like and how it benefits us, we of course want to create one ourselves. Of course, the scope of your story mapping will differ depending on various factors like team size, feature completeness, and the duration of the project, but the basic procedure stays the same. So, let us have a look at how to accomplish a story map step-by-step.
Step 1: Preparation is Key
This step is often viewed as more of a pre-phase nonetheless, a part whose importance is not to be underestimated. It is important that you beforehand gather together all the important documents. If you have technical documentation for a project and a product requirement document, use them for the story map. Also, take a good look at your prepared user personas. Those will provide a base for your map because without knowing your users you will not be able to understand what actions your users perform regarding your product.
Not only the preparation regarding your knowledge is important. Define what type of mapping tool you want to use. The easiest and most hands-on method is the good old pen-on-paper technique. For this, you will need a lot of sticky notes, pens, and a big space for all your great input. There of course are also tools that you can use online, like Trello, Jira, or Miro. This is especially useful if you are working remotely.
Whatever tool you decide on, make sure you have the necessary documents and needed utensils prepared beforehand.
After you gathered the necessary information, it is time to choose the people you want for the workshop. It is advisable to involve key members of different departments, not just your product team. Choose people that will actively partake in the discussion. Make sure that the team is not too big so that everyone has a chance to be part of the workshop and you can ensure a constructive discussion. Practically speaking, this means that you should not have more than ten people in your workshop.
Now that you know who will be involved in the workshop you should set up the meeting and start the onboarding process for the involved parties. Make sure to tell them what the goal of the meeting is and what you will need from them. Maybe send them the information you already have so that they can prepare what they want to bring up in the workshop beforehand.
In conclusion, after step 1 you have:
- Gathered relevant documents
- Prepared and looked at user personas
- Chosen a mapping tool (online/offline)
- Put a team together consisting of various departments key members
- Set the time and date for the meeting
- Informed the involved parties about what the workshop is about
Step 2: Get the Big Picture
The story mapping technique is a top-down model, which means you first have to be clear on your overall vision and from that derive your goals. These goals should be formulated as executive activities. These in turn need to be executed by your users. In order to do that they have to perform tasks. If you take these tasks, you can transform them into customer stories.
Knowing that means you first and foremost need to specify a clear frame of what exactly you want to discuss. This will help you to stay on topic and not wander off to talk about features or parts of your product that are not relevant at this moment. In practice, the set frame is often a version of your product that only contains the key features also called MVP (Minimal Viable Product).
Keeping the frame in mind you now can define which sections you want to have on your map. Of course, you will need the earlier developed personas, user stories, and epics, but you can add on further to the map and also include ideas or preliminary topics.
After all this preparation it is finally time to start the meeting and therefore the story mapping process.
Step 3: Get Everyone on Board
Start the meeting with a short warm-up to make everyone feel welcome and talkative. Then start explaining what it is you and your company want to gain from this meeting. Tell the participants what story mapping is in case they do not already know and be clear on the structure of the meeting and the story map.
Step 4: Start with the User Activities
The mapping process itself begins with the activities of your users. You will want to lay down the entire user journey summarized into generalized tasks. These should be based on customer personas. The activities are laid down in the form of various epics. These should describe general tasks that users can perform. A user activity differs from a user story in its objective. User activities define a piece of the process while user stories define features. Try to be as precise as possible when defining these epics by always keeping your personas in mind and connecting them to the respective activity.
After this step, you will have a set of steps that your customers complete when using your product from the beginning to the end of their journey. Try to think of it more as an ideal walkthrough rather than a step-by-step- guide. This is the basis for your X-Axis.
Step 5: User Stories
Now that you have created the epics, you can begin to break them down into different user stories. User stories focus on the functionalities that together enable the epic to work as a whole. Practically speaking this means that you position your user stories under the epic on your map. The volume of user stories is depending on the scope of your features. For an MVP it will be less than for a more completed product.
Step 6: Prioritize stories
At this point, we have our epics as well as user stories defined. The last crucial part of the process now is to prioritize the features. You should discuss in your group which stories are indispensable and critical at this time and day. This of course can be very tricky. It, therefore, helps if you divide them into categories like “Must-haves” “nice-to-haves” and “will-not-haves”. With levels like these, it is easier to clarify which user stories should be on top of the prioritization list on your story map. With this done and releases set you now have a completed user story map at hand.
Story mapping example
Example: You work at an online bookstore and want to map out the book-finding process. To have a better visualization of your story mapping process it helps to use different colors for each step.
First, we need to define the goal.
Goal: Find a book
Now you look at the different activities users can undertake to reach this goal.
Activities: use text search for the book, browse through categories, …
To simplify this example, we focus on only one activity – using text search.
Epics: type in the book title, view search results, open up a result, view further information, …
At this point, we break down the epics into their user stories.
User Stories: full-text search, Boolean operators, display search results, product filters, display product details, display product image, …
To optimize our process, we now need to prioritize those.
Prioritization: full-text search, display search results, display product details, display product image, product filters, Boolean operators
Et voilà! Here we have the story map that helps you not only gain insights into the development process but also meet the needs of your customers.